
People start using HubSpot CRM for a variety of reasons, but they all agree on one thing: they want to get it up and running as quickly as possible.
If you want to know how to get started with HubSpot CRM, this post is for you. Discover the most important steps to understand the value of this tool.
Below is a suggested schedule to complete this task in 5 days:
- Day 1: Integrate your email
- Day 2: Create filters and import contacts
- Day 3: Define the stages of your agreement
- Day 4: Create a lead ad and integrate with your website
- Day 5: Invite your team
7 Steps to Implement HubSpot CRM in 5 Days
1. Integrate your email
Connecting the CRM to your email is easy to do and as soon as it’s set up, all the emails you send and receive will automatically be stored in your CRM.
What does this step consist of?
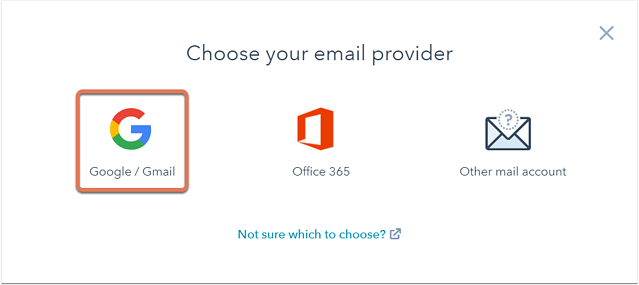
Email integration consists of two parts: connecting to your inbox and adding the email extension.
Connecting your inbox to the CRM allows you to send emails from individual contact records and unlocks other features, including automatic logging of email responses.
The extension adds CRM features inside your Google, Outlook, and Office 365 inbox. This way, you can search contact records, log emails, and use other tools (like email templates and meeting links) without leave your inbox.
Because it is important?
Email integration will save you a lot of time. You won’t have to worry about manually recording the emails you send and receive. Instead, all your email activity will be automatically recorded within the CRM.
How does it work?
If you use Office 365 or Google you can connect your inbox with your account credentials. If you’re using a different email provider, you can connect your inbox using IMAP. Either way, once the connection is set up, your CRM and email inbox will stay up to date on the emails you send and receive from your contacts.
This is a great first step to using HubSpot CRM. A CRM without any data is just an empty box. It’s impossible to know if it meets your needs until you start using it. Email integration will provide you with data without any additional work on your part. Then you can start using the CRM to organize that data (which is what we’ll do in the next step).
For the email extension there is some variability between the tools:
-
If you use Gmail you will install a Chrome extension that places CRM tools in your Gmail inbox every time you log in through Chrome.
-
If you use a web version of Outlook you can get the email extension from Microsoft AppSource. This version of the extension is installed directly into your account and will be accessible regardless of the browser.
-
If you use a desktop version of Outlook you will need to install an Outlook add-in.
Once you have installed the email extension you will be able to automatically register emails in the CRM. You’ll also be able to track the emails you send, so you’ll know if your contacts are opening them. This is a key insight into how engaged your contacts are.
Documentation:
-
Inbox connected
-
Email extension
2. Create filters
After connecting your email to the CRM, you’ll get a contact record for each person you email. As you get more and more contacts, you’ll need a way to organize them. It’s time to learn to filter.
What does this step consist of?
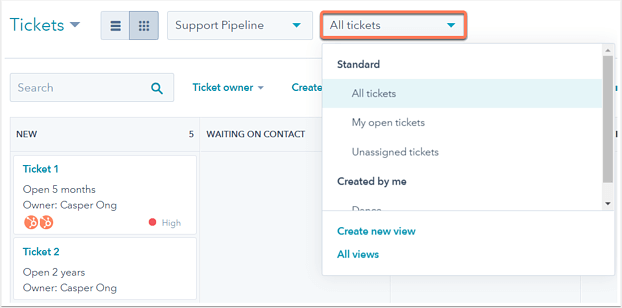
HubSpot CRM filters records in real time. This means you can put together lists of similar contacts based on any information in the CRM.
Because it is important?
Perhaps the biggest benefit of having a CRM is the ability to organize your data in an actionable way. You can use instant filtering in HubSpot CRM to identify which contacts you should focus on and make sure nothing falls through the cracks.
How does it work?
Each record in HubSpot CRM has many properties that contain small pieces of information. For contacts, these are things like name, email address, and company. If you’ve only used the email integration, many of these properties will be blank, but you’ll still be able to quickly filter your contacts based on emails you’ve sent and received. For example:
-
Recently opened sales email: This property stores the date of the last time a contact opened an email registered by you. You can filter your contacts based on this property to find those you haven’t emailed recently and see what’s going on with them.
-
Recent Sales Email Reply: This property stores the date of the last time a contact responded to one of your emails. If it’s blank, then you know they’ve never responded to you. If this is a person you’ve communicated with several times, it may be time to create a new point of contact. There is also a “number of times contacted” property that shows you the number of times each person was contacted. Together you can be very strategic about where to focus your efforts.
The more data you put into HubSpot CRM, the more sophisticated your filters will be. If you like filters, you’ll be able to import your previous records (which is what we’ll do in the next step).
Start now.
Access your contacts in HubSpot
Documentation: Click here for more instructions .
3. Import contacts
With steps 1 and 2 you learned about CRM and saw how it works. If you want to dive deeper, it’s time to move your historical records from your old system to HubSpot.
What does this step consist of?
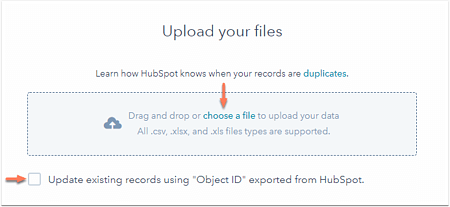
Importing is a way to take the information you have about your contacts and bring them into HubSpot. If you have information about the people you work with, you can import it as contacts. You can also import information about companies and sales (offers).
Because it is important?
As we saw with filtering, the value of CRM is limited by the amount of data you store in it. As you enter more information into the CRM, you’ll be able to organize it more accurately, and ultimately, that will turn into better focus on your outreach and better results from your efforts.
How does it work?
You can import contacts from a spreadsheet or directly from your Gmail contacts. If you’re using a spreadsheet, create a column for each property you want to import information into. This gives you the ability to fill out all the information you want in a single import, rather than creating individual contacts one at a time.
Start now.
Click here to import your contacts.
Documentation: Click here for more instructions .
4. Define the stages of your agreement
In addition to organizing your contacts, you need to structure your sales. As you guide people through your sales process, offers will help you track everyone’s progress. But offers are more useful if you customize them to match your sales process. That’s where the stages of negotiation come into play.
What does this step consist of?
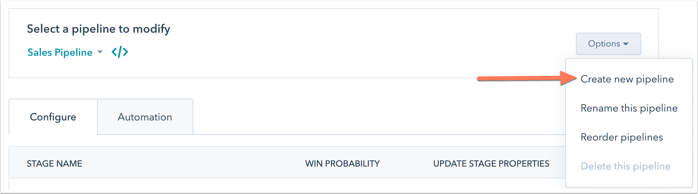
The deal stages within HubSpot CRM should represent the steps of your sales process. The CRM comes with predetermined stages, but the offers as a whole will be much more useful if you customize these steps to match your sales process.
Because it is important?
In sales you have to manage several relationships simultaneously. It can be difficult to track the progress of individual prospects. We recommend using deal stages to design your sales process visually; You can then drag and drop individual deals from one stage to the next. This way you will see where each potential sale is and identify obstacles.
How does it work?
There are specific actions you need to implement when helping a person make the decision to become your client. If you understand what those actions are and in what order they should occur, you can create an agreement for each of them. Then, create a deal each time you’re working on a potential sale and move it from one stage to the next.
When creating the stages of your business, you must assign each one a name and a probability. This refers to the possibility of you closing the deal. This information is used to calculate the deal forecast in your sales dashboard.
If you’re not sure what the probability is, it’s easier to think of it as a percentage, as in the case of the staged sales process. If your first stage is Appointment Scheduling you could call it 10%. But later on, a stage like Contract Sent might be right at the finish line, so you could call it 90%. This is a good approach to help you get started. You can always adjust the odds later if necessary.
Start now.
Access your offers in HubSpot
Documentation: Click here for more instructions.
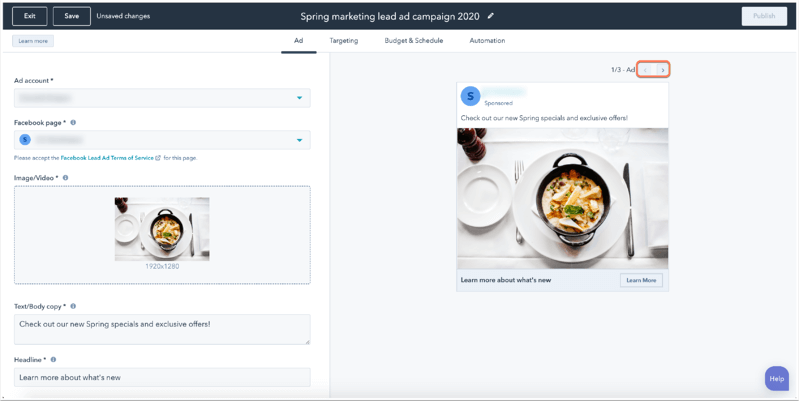
5. Create a lead ad
Now that your CRM is fully set up and your existing contacts are in it, it’s time to start generating new leads.
What does this step consist of?
Facebook Lead Ads were created specifically for small and medium-sized businesses that sell to other businesses. The ads feature an eye-catching CTA and use Facebook data to automatically fill out forms. You can have these leads sent immediately to HubSpot.
Because it is important?
More than 2 billion people access Facebook every month, so whoever your target market is is on Facebook. Lead ads give you access to Facebook’s massive inventory and powerful AI-based targeting. The goal is so you can target the people who are most likely to interact with you on Facebook desktop, mobile app, and Instagram.
How does it work?
Create an ad and designate your target audience within HubSpot. Then, as your ad attracts leads, they will be added as contacts within the CRM.
Start now.
Access your ads in HubSpot
Documentation: Click here for more instructions.
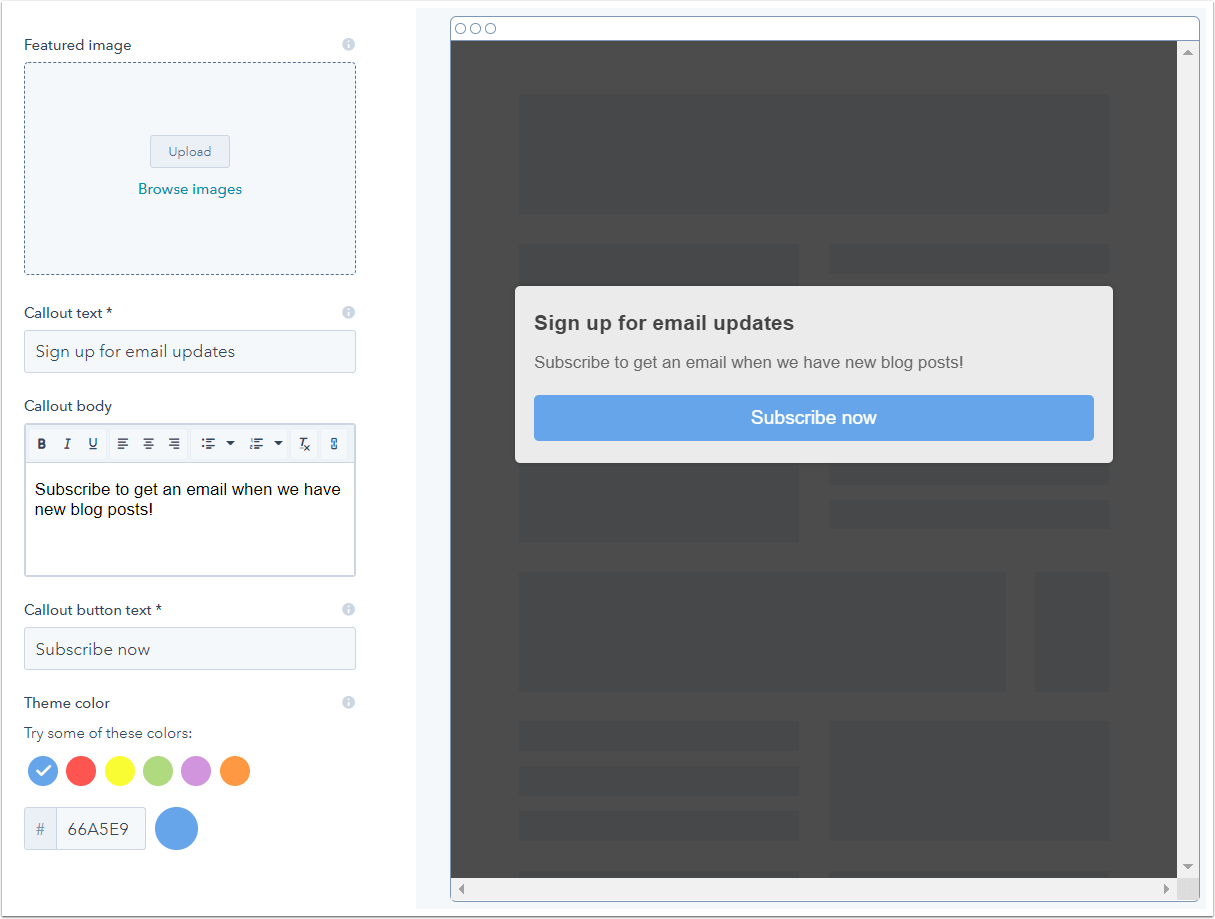
6. Integrate with your website
Facebook is not your company’s only online presence. You can connect HubSpot CRM to your website to capture your visitors.
What does this step consist of?
HubSpot provides JavaScript tracking code that can be added to your website. Once installed, you can create lead flows, which are small windows that appear on specific pages, to collect information from your contacts and deliver content to them.
Because it is important?
Your website is often the first impression people will have of your company. If they want to engage more with you, you need to provide them with a way to do so. But if that information is collected in a separate system, rather than your CRM, you may never see it. Having all your customer information collected in one place is a key benefit of HubSpot CRM.
How does it work?
Once you’ve installed the tracking code on your website, you can create lead flows within HubSpot CRM; These will be automatically added to specific pages on your website. Then, every time a visitor submits their information, it will go directly to your CRM, along with all your other contacts.
Start now.
Click here to get your JavaScript code.
Documentation: Click here for more instructions .
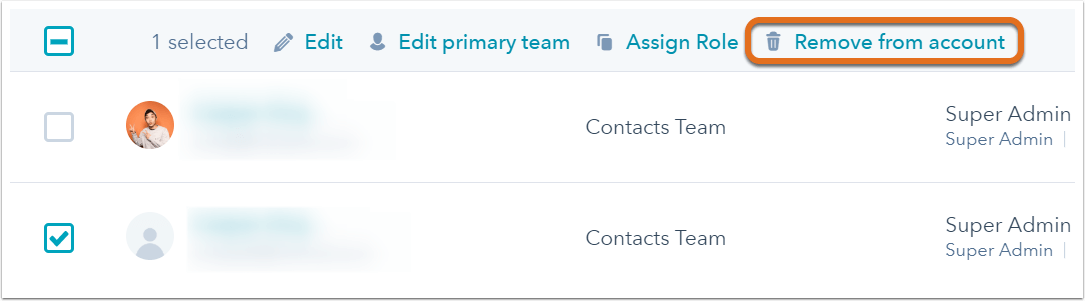
7. Invite your team
Now that you’ve fully configured your CRM, it’s time to invite your teammates to join the party.
What does this step consist of?
Inviting team members gives them access to information within your CRM. You can also control their level of access, limiting them to certain parts of the CRM, and also whether they can edit or only view the information there.
Because it is important?
Perhaps the most important job a CRM can do is provide shared visibility across the entire team. Your marketing, sales, and customer service teams should have a single system of record for customer information. HubSpot CRM does that job well, but only if the necessary employees have access to it. By inviting your team to join you within the CRM, you are taking the first step to unify your company at the service of your customers.
How does it work?
You can add as many users as you want to HubSpot CRM and you can control the level of access they will have. Once you do, you will receive an email with instructions to log in.
If you invite sellers to the CRM, make sure they earn HubSpot Sales Software Certification. It’s a quick two-hour course that covers everything you need to know to use HubSpot in your daily work.
Start now.
Click here to add users to your CRM .
Click here for more instructions .
With these steps you have all the necessary resources to configure your HubSpot CRM according to the needs of your company. Now you have everything ready to enjoy the complete experience, and take advantage of all the resources that this software offers to optimize and grow your business.

